skateboard video recorder look with adobe after effects
To bring some change and nostalgia to all your HD skate footy, you can create a video recorder look in Adobe After Effects: Grainy, with tv interferences and color shifting.
STEP 1 – GRAIN
- Create a new After Effects composition and name it “VHS Look”.
- Import your skateboard footage and drag it to the timeline window (>File >Import >File).
- Select the skate video footage on the timeline and add some noise. (>Effect >Noise & Grain >Noise)
- Now create a few keyframes and change the grain around for each one of them.
- To get sudden changes between the keyframes you have to disable the interpolation (the change in-between keyframes): Select all keyframes and click right to get in the “keyframe-interpolation”-menu. Select “Temporal Interpolation >Suppress”.
- Create a pre-composition (>Composition >Pre-Composition) and call it “grain comp”.
STEP 2 – COLOR SHIFTING
- Copy the existing layer twice and place them accurately on top of each other.
- Name the layers “red”, “green” and “blue”.
- Next you have to mix the channels for each layer (>Effect >Color Correction >Channel mixer): For the “red” layer change green and blue to “off”. For the “green” layer change red and blue to “off”. For the “blue” layer change red and green to “off”.
- Then lighten all layers (>Effect >Blending Mode >Lighten)
- Move the layers a few frames against each other.
- Create a pre-composition (>Composition >Pre-Composition) and name it “shifting comp”.
STEP 3 – TV-INTERFERENCES
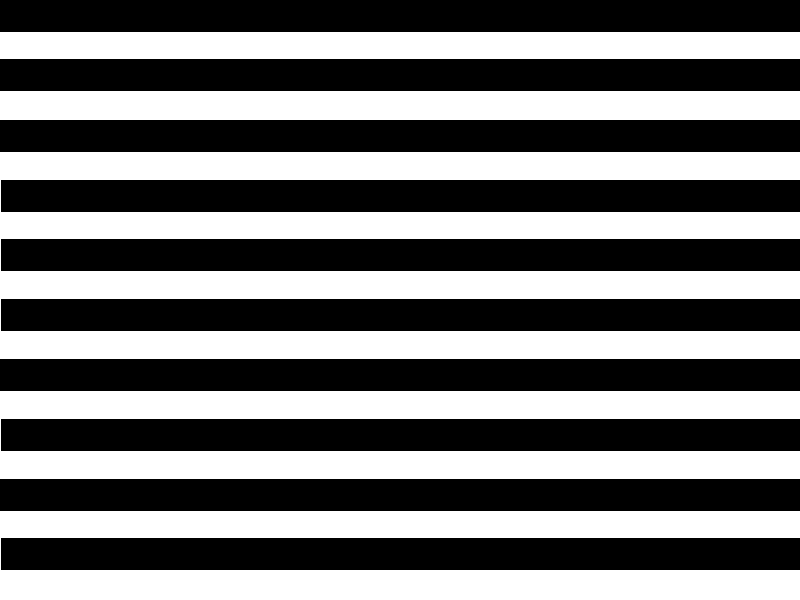
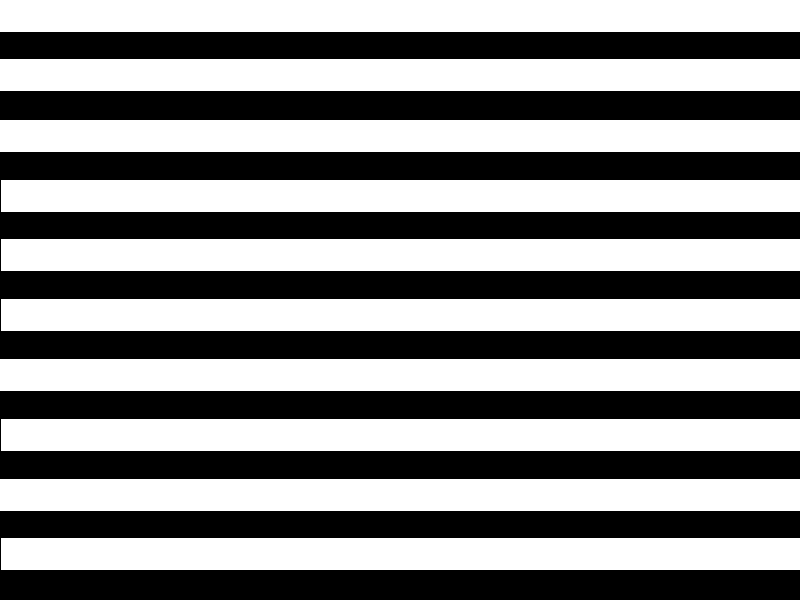
- Either you download the two striped images below or you create your own with an image editor software: Make sure the size of the images fit the size of your video project in After Effects (or are slightly bigger). Create a white background and overlay it evenly with thin black lines. Call this image “odd”. Open, invert and save a copy of this image as “even”.
- Import both images as seperate layers into your After Effects project (>File >Import >File).
- Duplicate the “shifting comp” layer and put all layers in the following order: (from bottom to top) “shifting comp” – “odd” – “shifting comp copy” – “even”.
- Add the “odd”-layer as “Luma-Key” to the “shifting comp”-layer (>Select “odd”-layer >Effect >Keying >Luma-Key).
- Switch off the “visibility” off this matte-layer (odd).
- Add the “even”-layer as “luma-key” to the “shifting comp copy”-layer (>Select “even”-layer >Effect >Keying >Luma-Key). Also switch off the “visibility” off this matte-layer (even).
- Slightly offset the “shifting comp”-layer horizontally (>Effect >Distort >Offset).
- Select all layers, create a pre-composition (>Composition >Pre-Composition) and call it “final comp”.
- However the footage doesn’t look very interfered until you shift the lines a bit: Import either the “even”- or “odd”-layer again and place it with drag’n’drop on top of all other layers.
- Add a multiplying blending mode to this layer (>Layer >Blending Mode >Multiply)
- Eventually set the opacity between 15 and 30 percent.
FINE TUNING
Optional you could add a horizontal Gaussian Blur to the “even”- and “odd”-layers (>Effect >Blur and Sharpen > Gaussian Blur).