skateboard photography basics
Most of the following skateboard photography basic tips also apply for the filming of skateboard tricks!!!
STORY: Before you shoot a skateboard photo consider which story you want to tell with it: If you take a picture with some back light at an abandoned spot, you probably tell the story of the lonesome shredder who only skates for himself. Maybe, if you shoot the photo from the other side, one sees a busy street and ten homies – you tell the story of a massive late afternoon skate session.
SPOT SELECTION: Skatepark photos are dull! Rough streetspots are the shit!
DISTRACTION: Remove all skateboards, backpacks, water bottles and gangsters from the picture. They only detract from the photo’s subject – the skater and his trick!
COMPOSITION: Make sure you remove all abandoned skateboards, backpacks, water bottles and trash from your picture.
They just distract from the photographed subject – the skater and his trick! Also chase away the so called “lurkers” – nothing makes a skate photo less aesthetic than your gazing homies in the background.
LIGHT: The right lighting of a trick is half way there, but needs a lot of experience, especially if you use additional flash lights (so-called “slaves”). The sun should always remain the main source of light (except at a nightshooting…). When the sun is shining brightly do not even think about touching your flash lights. Use the natural light and find a position that makes the skater stand out.
MOMENTUM: To catch the skateboarder in the perfect moment definitely needs some practice too, in particular with flip tricks! Of course only photos of landed tricks count.
CLOTHING: Well, nobody really cares what the photographer wears. But the skater should not show up in black jeans and a black heavy metal shirt for a nightshooting! Hence make sure in advance your protagonist forms a good contrast to the spot!
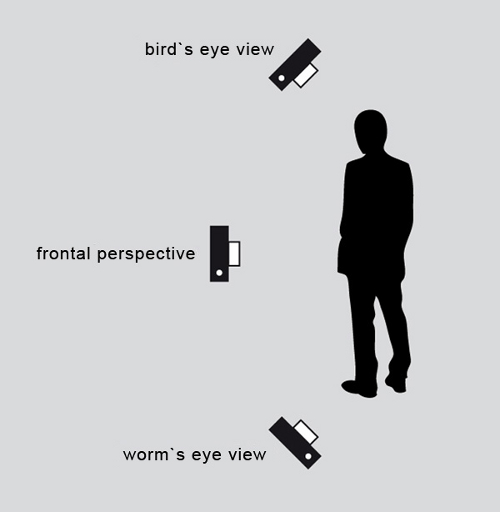
PERSPECTIVE:
The basic perspectives are easy: frontal, bird’s eye and worm’s eye view.
Carefully consider the point of view! Does the trick look better if it is shot with a telephoto lens from the other side of the street or with a fisheye (wide conversion lens) from right under the handrail?
Taking a photo of the skateboarder directly from the front leads to a flat, dull photo. Play with perspectives and angles!
However, always keep the horizon horizontal!
And avoid so-called “butt shots”: A skater’s grimace is so much more interesting than the colour of his boxershorts!
CAPTION: Choose a big caption you can see the whole spot on – because a good story should always have a clear beginning and a clear end.
The focus of the picture should always lie on the WHOLE skater. Absolutely avoid cutting off head, arms or legs of your victim!
BALANCE (RULE OF THIRDS): Asymmetrical picture compositions are mostly more exciting than symmetrical ones: Virtually split your skateboard photo in thirds – both horizontally and vertically. The subject of your photograph should be at one of the four crossings of the third lines. Later viewers of the skate photo will find it more aesthetic if the subject is not situated exactly in the middle.
LEADROOM: In a photograph the space in front of a moving object, in our case the skateboarder, is called “leadroom” or “noseroom” and is very important to the viewer. Hence you should always show where the skater moves (that is where he lands the trick) and this space should be bigger than the space behind the rider.
DEPTH OF FIELD: You can vary the so-called “depth of field” to isolate your skate photo subject. The “softening” of photo elements allows you to keep foreground and background objects in the picture without overloading the skateboard photo.
MOTION FOCUS: You can absolutely experiment with the depth of field, however skater and board must always be in focus! You can achieve this by setting your photo camera to a high shutter speed.
NATURAL FRAMES: With the help of certain objects at the skate spot, such as buildings or trees, you can create a natural frame around the skater. This emphasises him even more.
CONTRAST: You can also emphasise certain things in a photograph by strong contrast – e.g. a skateboarder in a bright shirt in front of a dark background. Or you use contrasts by strong color differences.
MERGERS: Avoid mergers of several objects in your skate photo! This happens by wrong photo camera setting or perspective choice: objects in the foreground melt apparently with objects in the background.

